TRADE KNOWLEDGE
Wall-Mounted vs. Ceiling-Mounted
Curtain Rod Brackets
A product specification guide for importers and distributors
By the Xiamen Accent Product Team · Window Treatments · Curtain Hardware · Trade Resources
When your retail buyers or end-consumer customers ask “which bracket do I need?” — your sales and product teams should have a crisp, confident answer. Misspecification leads to returns, installation complaints, and lost repeat business. As a manufacturer supplying importers and distributors across global markets, we put together this guide to give your team a solid grounding in the two core bracket types: wall-mounted and ceiling-mounted. Understanding where each excels — and where it falls short — sharpens your product recommendations, supports smarter range-building decisions, and reduces friction all the way down the supply chain.
SECTION 1 · THE BASICS
How Each Bracket Type Works
Both bracket types serve the same structural function — supporting a curtain rod — but they anchor to different surfaces, suit different end-use environments, and drive different buying decisions at retail. Here’s how each works in practice.
|
WALL-MOUNTED The Everyday Standard Brackets fix to the wall surface, typically 4–10 inches above the window frame. The dominant bracket type globally — the volume SKU in most hardware ranges — and the default specification for residential windows across all major import markets. Key markets: Standard residential · Rental · Traditional décor · Entry-to-mid price tiers |
CEILING-MOUNTED The Architectural Upgrade Brackets anchor directly into the ceiling, or a track system mounts flush with the ceiling surface. A specification increasingly favoured in contemporary residential and hospitality interiors, and the standard solution for room dividers where no fixed wall is present. Key markets: Premium residential · Hospitality · Minimalist décor · Room dividers |
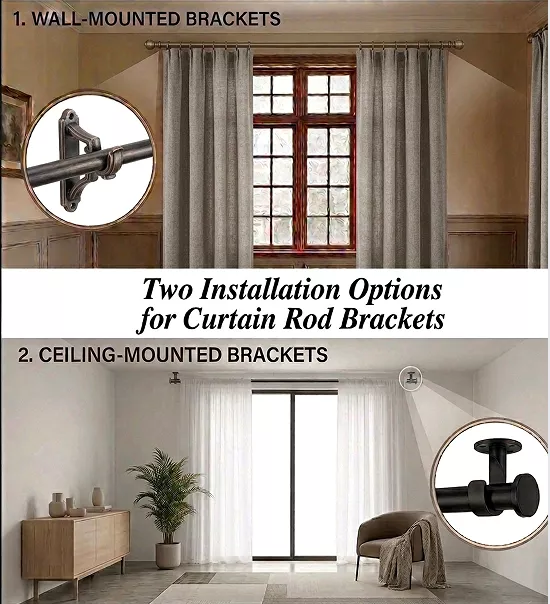
two installation options for curtain rod brackets
SECTION 2 · FEATURES
Key Features Side by Side
How the two bracket types compare across the dimensions that matter most for product specification, range planning, and end-user satisfaction.
|
Feature |
Wall-Mounted |
Ceiling-Mounted |
|
Mounting surface |
Wall above window frame |
Ceiling or ceiling-height track |
|
Installation difficulty |
Easy — standard drill, locate studs |
Moderate — overhead drilling, harder to level solo |
|
Curtain panel length |
Standard lengths work |
Extra-long panels required; floor-to-ceiling |
|
Visual effect |
Classic, proportional window framing |
Elongated walls, dramatic height illusion |
|
Hardware variety |
Extremely wide — all styles and finishes |
Limited rod styles; track systems more common |
|
Works without a wall |
No — requires adjacent wall surface |
Yes — ideal for freestanding room dividers |
|
Anchor reliability |
Studs predictable, easy to locate |
Joists less consistent; may need toggle bolts |
|
Damage on removal |
Small holes, easy to patch |
More holes in ceiling; patching more visible |
|
Light blockage above window |
Gap possible above rod if mounted low |
Ceiling mount eliminates top light gap entirely |
|
Cost |
Lower — wider availability, more competition |
Higher — track systems especially; specialty hardware |
SECTION 3 · PROS & CONS
Wall-Mounted Brackets
The backbone of most curtain hardware ranges — high-volume, broad-appeal, and lowest barrier to specification. Understanding its limits helps your buyers avoid the handful of situations where it’s the wrong call.
|
ADVANTAGES |
LIMITATIONS |
|
✓ Simplest and most beginner-friendly installation |
✗ Height limited by wall space above window trim |
|
✓ Enormous selection of styles, materials, and finishes |
✗ Gap between rod and ceiling can look awkward |
|
✓ Works with standard-length curtain panels |
✗ Cannot be used where no adjacent wall exists |
|
✓ Easy to patch on removal — minimal wall damage |
✗ Light can enter above the rod if mounted too low |
|
✓ Lower average cost across all price points |
✗ Less dramatic — won’t create floor-to-ceiling effect |
|
✓ Studs are easy to locate for a secure mount |
|
|
✓ Ideal for renters wanting a clean move-out |
|
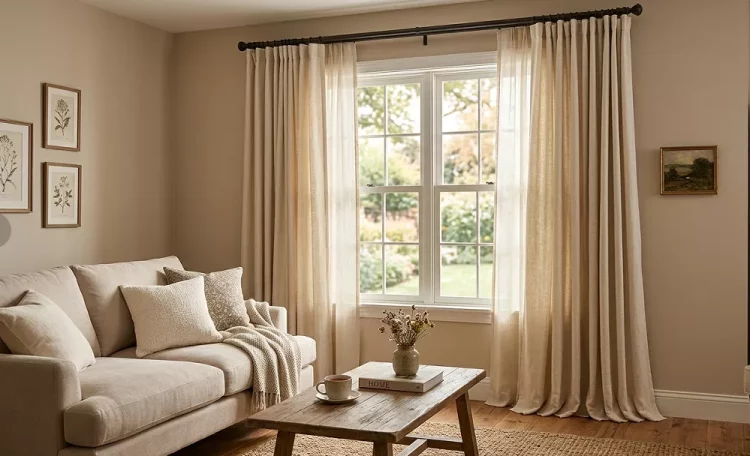
wall-mounted brackets
�� Selling tip for your retail buyers:
Even with wall-mounted brackets, mounting the rod 4–6 inches above the window trim — or as close to the ceiling as the wall allows — creates a taller-looking room at no extra cost. Coaching your retail buyers on this “high mount” technique increases perceived value and reduces post-purchase dissatisfaction with proportions.
Ceiling-Mounted Brackets
A premium-tier specification with a growing retail footprint — particularly in contemporary residential, hospitality, and high-design segments. The installation complexity is real, but the end result consistently commands stronger margins.
|
ADVANTAGES |
LIMITATIONS |
|
✓ Creates dramatic floor-to-ceiling visual height |
✗ More complex installation — overhead drilling is awkward |
|
✓ Works as a room divider with no wall needed |
✗ Ceiling joists harder to locate than wall studs |
|
✓ Eliminates the light gap above the rod entirely |
✗ Requires extra-long panels; standard lengths rarely fit |
|
✓ Ideal for bay windows and angled wall layouts |
✗ More limited hardware and style selection |
|
✓ Clean, architectural look in modern spaces |
✗ Higher cost, especially for ceiling track systems |
|
✓ Can conceal blinds or other window hardware |
✗ Ceiling holes more conspicuous to patch on removal |
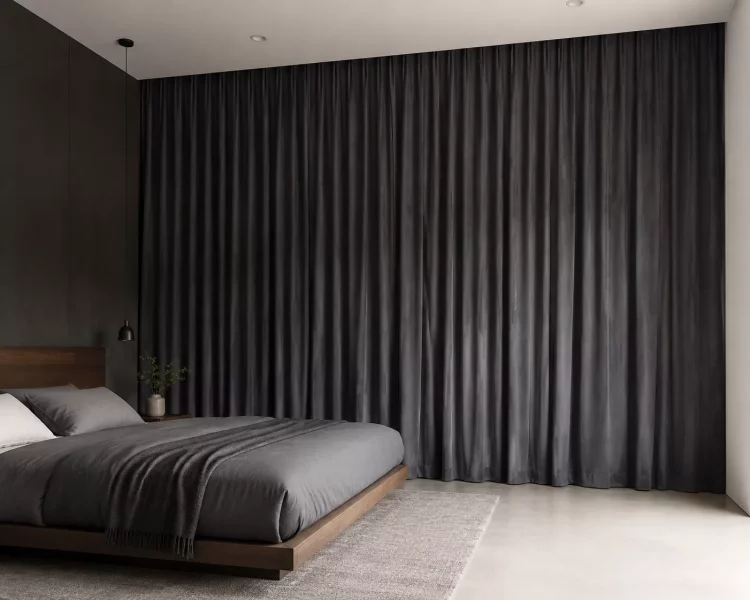
ceiling-mounted brackets
�� Range planning note:
When stocking ceiling-mounted hardware, consider including a ceiling track system alongside traditional bracket-and-rod SKUs. Tracks are more stable over long spans, easier to level on installation, and glide more smoothly — qualities that translate directly to fewer installer callbacks and stronger word-of-mouth at the retail level.
SECTION 4 · BEST APPLICATIONS
Where Each Type Truly Shines
Both types have clear home markets. Knowing these helps your team guide distributors and retail buyers toward the right SKUs for their customer mix.
“When your buyers can confidently specify the right bracket from the start, returns drop, reviews improve, and reorders follow.”
Wall-Mounted — Ideal Applications

wall mounted curtain rod bracket applications
Ceiling-Mounted — Ideal Applications
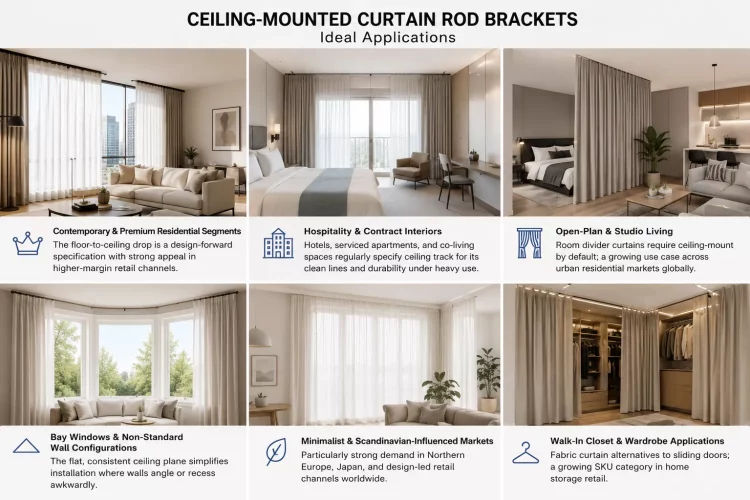
ceiling mounted curtain rod bracket applications
SECTION 5 · DECISION GUIDE
When to Choose Each — Scenario by Scenario
Use this as a quick-reference guide for your sales team — or share it directly with your retail buyers and distributors to support specification decisions at the point of sale.
|
Situation |
Specification |
|
Standard bedroom or living room window — rectangular window, typical wall space above |
Wall-Mounted |
|
Want to make the room feel taller — low or average ceiling, dramatic vertical effect needed |
Ceiling-Mounted |
|
Creating a room divider or studio partition — open-plan space where curtains act as a soft wall |
Ceiling-Mounted |
|
Renting / minimise wall damage — smaller holes and easier patching on move-out required |
Wall-Mounted |
|
Bay window or angled wall layout — wall angles awkwardly; ceiling is the only consistent surface |
Ceiling-Mounted |
|
Blackout curtains needed — blocking all light including the gap above the rod is a priority |
Ceiling-Mounted |
|
Less than 4 inches between trim and ceiling — not enough wall space above the window for a clean wall mount |
Ceiling-Mounted |
|
Traditional, transitional, or classic décor — decorative rod finials and classic bracket hardware are a priority |
Wall-Mounted |
|
Replacing sliding closet doors with curtains — soft, fabric alternative; wardrobe and walk-in closet applications |
Ceiling-Mounted |
|
Budget-conscious project / entry-tier market — wide hardware selection at lower price points matters |
Wall-Mounted |
|
Minimalist, Scandinavian, or loft-style interior — clean, uninterrupted vertical lines are part of the design intent |
Ceiling-Mounted |
|
Hospitality / contract specification — hotel rooms, serviced apartments, high-frequency use environments |
Ceiling-Mounted |
SECTION 6 · SPECIFICATION NOTES
Three Things Your Buyers Should Know Before Installing
�� Curtain panel drop must be specified correctly for ceiling-mount.
Standard panel drops (84” / 96” / 108”) rarely reach the floor from ceiling height. Your buyers and their end customers need to measure exact floor-to-ceiling height and order panels 1–2 inches longer. Including this note in your product listings and buyer documentation significantly reduces ceiling-mount return rates.
�� Anchor point guidance reduces installation failures.
Wall studs are predictable and easy to locate. Ceiling joists are less consistent and may not align with bracket positions. Advise buyers to survey joist layout before committing bracket placement — and ensure your ceiling bracket hardware is supplied with quality toggle anchors rated for the rod’s maximum load. Including this spec in your product data sheet builds buyer confidence.
�� Load rating is a key spec to communicate clearly.
Heavy-weight panels — lined linen, velvet, thermal blackout — are significantly heavier than sheers and can exceed bracket load ratings if not matched correctly. For rod spans over 72 inches (180 cm), a centre support bracket should be included regardless of bracket type. Making load ratings prominent in your product specs reduces field failures and protects your brand reputation with distributors.
|
Looking to Source or Customise? We supply wall-mounted and ceiling-mounted curtain hardware to importers and distributors worldwide — in all finishes, load ratings, and custom configurations. Get in touch to discuss your range requirements. |
Tags: Curtain Hardware · Product Knowledge · Trade Resources · Specification Guide · For Importers & Distributors