CURTAIN HARDWARE GUIDE
This guide provides technical instructions for selecting and mounting curtain hardware with professional accuracy. It details how to determine ideal rod length and height, when to use center supports based on the rod’s material, diameter, and total weight load, how to match hardware to various curtain heading styles. The source also includes a safety checklist to help users verify that their chosen brackets and anchors can support the dynamic weight of heavy fabrics.
SECTION 01 · Rod Anatomy & Key Terminology
Rod Set Components
Before measuring, it helps to understand the basic of metal curtain rod sets:
|
COMPONENT |
WHAT IT DOES |
COMMON SIZES / SPECS |
|
Rod tube |
The main horizontal bar that bears the curtain weight. Single-piece or telescoping (two overlapping sections). |
Ø 16 mm,19 mm, 25 mm, 28 mm, 35 mm |
|
Finial |
Decorative end cap. Screws or press-fits onto each end. Adds 3–8 cm to total visual length. |
Ball, cone, square, ornate styles |
|
Bracket |
Wall-mounted support that holds the rod. The most critical component for load and alignment. |
Projection: 6–20 cm from wall |
|
Curtain ring |
Slides along the rod; hooks or clips attach the curtain panel. Optional for eyelet/tab-top styles. |
Inner Ø 28–40 mm (must match rod) |
|
Center support bracket |
A third bracket used mid-span for rods over 180 cm to prevent sagging. |
Required when span > 180 cm |
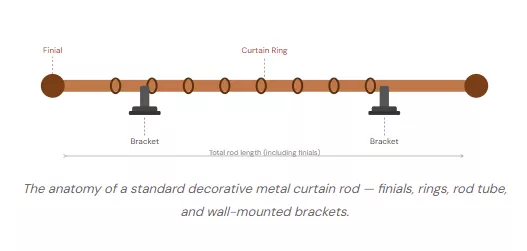
curtain rod set components
SECTION 02 · How To Measure - The Standard Method
How To Measure Rod
Accurate measurement before purchasing eliminates the most common installation mistakes: rods that are too short, or too long:
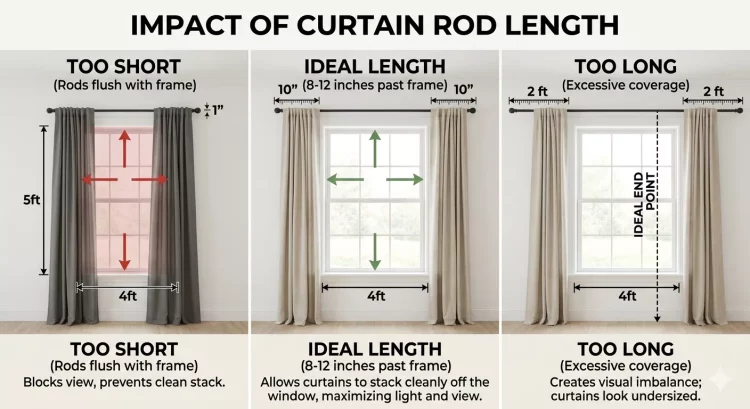
impact of curtain rod length
2.1 Rod Length
Measure the window width from outside frame edge to outside frame edge (Frame width). Then add the extension — the amount the rod projects beyond the window on each side, here are some common suggestions:
- 15 cm per side — minimum extension; suits smaller windows with limited wall space
- 20–25 cm per side — standard residential choice; allows curtains to stack off the glass when fully open
- 30 cm per side — maximum light clearance; best for large windows or where full glass exposure is needed
Formula: Rod length C = Frame width B + (Extension × 2)
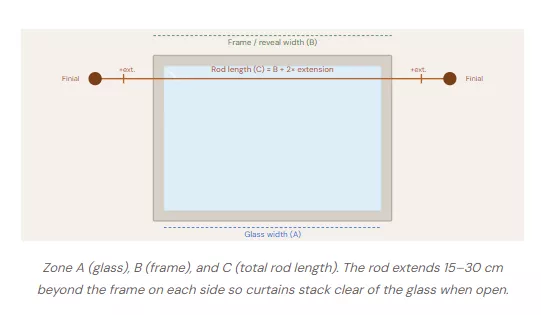
curtain rod length formula
2.2 Mounting Height
Height placement: where to mount the rod
Rod height above the window top dramatically affects the perceived ceiling height of the room. Four standard positions:

Curtain Rod Mounting Height
|
POSITION A Just above the frame (3–5 cm) Practical, minimal. Good for café curtains, kitchens, and small windows where space above is limited. |
|
POSITION B —standard minimum Mid-height (10–15 cm above frame) The standard residential position. Conceals the window top while giving a generous hanging drop. |
|
POSITION C — most common Near-ceiling (15–30 cm or to ceiling) Creates the illusion of taller ceilings. Allows pencil pleat and ring headings to fall neatly. Most designers recommend this for living rooms and bedrooms. |
|
POSITION D Ceiling-mounted or cornice-flush Ceiling brackets used when the gap between window and ceiling is under 20 cm. Requires specialized ceiling brackets. |
SECTION 03 · Bracket Placement & Spacing
Bracket Placement & Spacing
Brackets are the load-bearing heart of any rod installation. Getting their position right prevents sagging rods, stripped walls, and failed installations down the line.
End bracket position
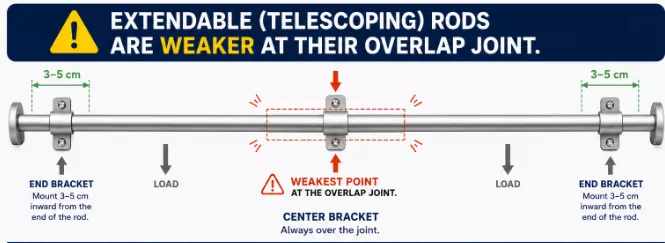
End brackets should be mounted 3–5 cm inward from each end of the rod (not at the very tip). This gives the finial room to sit clear of the wall and lets the curtain panel hang without bunching at the bracket.
When to add a center support bracket
Every rod has a maximum unsupported span before it visibly sags. This is set by both diameter and material:
|
ROD DIAMETER |
MATERIAL |
MAX SPAN (NO CENTER BRACKET) |
|
19 mm |
Steel |
150 cm |
|
25 mm |
Steel |
180 cm |
|
28 mm |
Heavy steel / iron |
200 cm |
|
35 mm |
Wrought iron / heavy steel |
280 cm |
|
Any diameter |
Aluminum (hollow) |
30% less than steel equivalent |
center support bracket
|
IMPORTANT — TELESCOPING RODS Extendable (telescoping) rods are weaker at their overlap joint. Always use a center bracket over the joint for rods extended beyond 150 cm, regardless of diameter. |
Bracket projection (depth from wall)
Projection determines how far the rod sits away from the wall, which governs whether curtains can pass in front of window trim, blinds, or shutters underneath.
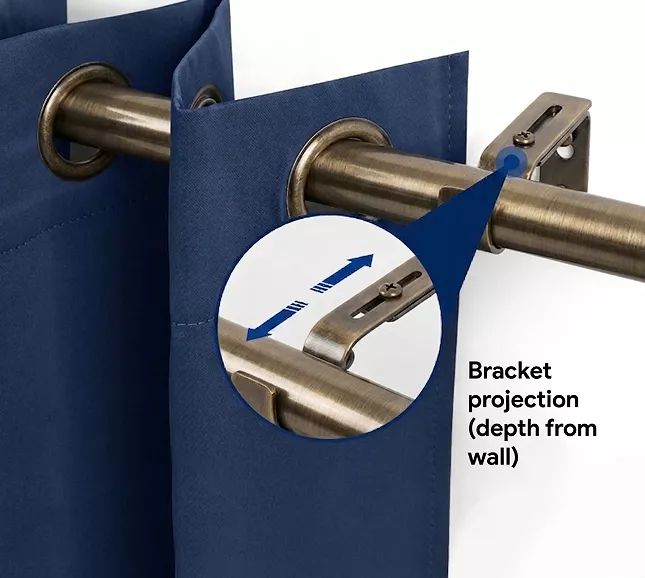
Bracket projection (depth from wall)
|
WHAT’S BEHIND THE CURTAIN |
RECOMMENDED BRACKET PROJECTION |
|
Flat wall (no blinds) |
6–8 cm |
|
Venetian or roller blinds (25–40 mm depth) |
8–12 cm |
|
Vertical blinds or shutters |
12–16 cm |
|
Roman blind with head rail |
10–14 cm |
|
Double-bracket system (sheer + blackout rod) |
Front rod: 7–10 cm from wall · Back rod: 12–17 cm |
Projection tip: When curtains need to clear a window reveal, radiator, or deep sill, the bracket projection must be at least as deep as the obstacle. Measure the reveal or obstacle depth and add 20 mm for comfortable clearance.
SECTION 04 · Matching the Rod to Your Curtain Style
Matching the Rod to Your Curtain Style
Different curtain heading types have fundamentally different requirements for rod diameter, ring size, and bracket projection. Choosing the wrong rod means the curtain either won’t hang or won’t open smoothly.
|
CURTAIN HEADING STYLE |
ROD REQUIREMENT |
RINGS NEEDED? |
NOTES |
|
Eyelet / Grommet |
Rod Ø must be ≤ inner diameter of eyelet minus 5 mm. Typical: 19–25 mm rod for 40 mm eyelets. |
No — panels thread directly |
Rod must be smooth — no seams that snag fabric. |
|
Ring-top / Hook-and-ring |
Any decorative rod; ring inner Ø must exceed rod by ≥ 5 mm. |
Yes — rings slide along rod |
Most flexible; works with any rod diameter if rings match. |
|
Tab-top / Tie-top |
Smooth rod with no protruding finial neck; rod Ø ≤ tab width minus 8 mm. |
No — fabric loops thread onto rod |
Tabs can’t pass over bracket: always thread before mounting. |
|
Pencil pleat / Pinch pleat |
Any rod with matching hooks and rings; projection must clear the pleat depth (≥ 8 cm). |
Yes |
Pleats add 3–5 cm of bulk; ensure bracket projection is generous. |
|
Rod pocket / Sleeve |
Rod diameter must match the pocket width minus 3–5 mm for smooth gathering. |
No — rod threads through sleeve |
Once on the rod, curtains cannot be removed without dismounting. |
|
Cafe / Tier curtain |
Lighter rod (Ø 12–19 mm) is fine; often mounted inside the window reveal. |
Optional |
Inside-mount brackets needed for reveal installation. |
|
EYELET BUYERS — ORDER OF OPERATIONS Thread all eyelet panels onto the rod before mounting the second bracket. Once both end brackets are fixed and the finials are on, the panels are trapped. Plan assembly sequence before drilling any holes. |
SECTION 05 · Curtain Weight & Load Capacity
Curtain Weight & Load Capacity
Weight is the most commonly overlooked specification when ordering rod sets. A sheer voile weighing 150 g/m² and a lined blackout panel weighing 600 g/m² require completely different hardware — the same rod and bracket set that holds one may fail with the other.
Use this table to confirm that the rod diameter and bracket type you have chosen can support the actual fabric weight. Estimate weight per panel based on fabric type and panel dimensions.
|
YOUR SITUATION |
ROD Ø |
BRACKET TYPE |
ADDITIONAL ITEMS |
|
Sheer voile, small window (< 120 cm), light fabric |
19 mm |
Standard 2-screw, about 6 cm projection |
— |
|
Linen or cotton panels, medium window (120–180 cm) |
25 mm |
Standard 3-screw, about 8 cm projection |
Center bracket if > 180 cm |
|
Velvet or lined panels, large window (180–280 cm) |
28 mm |
Heavy-duty forged, about 10 cm projection |
Center bracket required; M6 anchors |
|
Full blackout, floor-to-ceiling, any width |
35 mm |
Cast iron or welded steel, 12 cm+ projection |
3+ brackets; masonry anchors required |
|
Sheer + blackout double layer |
19 mm + 25 mm |
Double bracket (front/back), 7–17 cm projection |
Rings for back rod; front rod for sheer |
|
Bay window (3 sections) |
25–28 mm per section |
Corner connectors + standard brackets |
Bay connectors at each angle; measure each section independently |
|
Weight estimation guide: A 140 × 260 cm panel in cotton or linen weighs approximately 1.2–1.8 kg. The same panel in velvet weighs 2.5–3.5 kg. Blackout lining adds 0.5–1.0 kg per panel. Interlining adds a further 0.8–1.5 kg per panel. |
|
SAFETY FACTOR RULE Always select brackets rated for at least 2–3× the calculated curtain weight. Rods experience dynamic loading when curtains are opened and closed repeatedly. A bracket rated exactly to the curtain weight will eventually work loose. |
SECTION 06 · Quick Selection Checklist
Quick Selection Checklist
Use this checklist before placing any order to confirm all variables have been considered.
Measurement
- Window width measured outside frame to outside frame
- Extension per side decided
- Rod mounting height marked
- Span calculated — bracket spacing confirmed
Rod Set Selection
- Rod diameter matched to curtain fabric weight
- Rod diameter compatible with heading style
- Rod diameter compatible with bracket bore
- Center support bracket included if needed
- Identified wall type and confirmed appropriate anchors are included or ordered separately
- Verified ring inner diameter exceeds rod diameter by at least 5 mm
- Estimated curtain weight and confirmed bracket load rating covers 2–3× that weight
- For eyelet curtains: confirmed rod will thread through the eyelet before mounting second bracket
- Double-checked rod color/finish matches the bracket finish in the same product range
Questions? Our engineering team can advise on custom spans, non-standard brackets, or commercial project quantities. Browse our Rod & Bracket Sets, request a Sample Kit, or contact Technical Support.→